
The Kit:
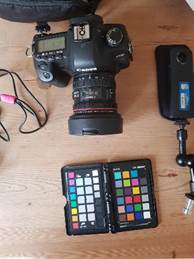
There are 2 options when you want to do a HDR. First is what I would call the ‘proper’ way using a good camera (in this case the Canon 5D Mk 2), a nodal ninja and a Promote remote control. Second is to use a 360 camera, in this case the Theta S.
Both methods basically involve the same process, taking a 360 sphere of pictures at multiple exposures and stitching them together to form a HDR image which contains not only light direction and colour, but also intensity.
5D Method
A standard HDR kit should include:
Standard tripod
8-15mm lens (179 degree view at 8mm) – set it to 8mm
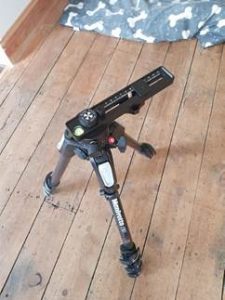
Nodal ninja
This allows the camera to rotate on a tripod about its nodal point. The aim of this is to reduce or remove parallax when taking a 360 sphere of photos.
It is made up of one base plate section with horizontal beam, one vertical beam made up of two pieces that can rotate and a camera base plate.
The ninja is easy to calibrate for your camera, just google setup tutorials.
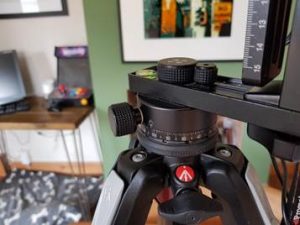
Assemble as follows:
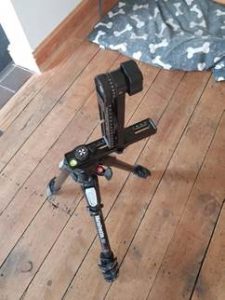
Check the alignment by aiming the camera vertically downwards at the white cross logo on the dial on top of the base plate. It should be in the centre of the frame. If it’s not dead centre don’t worry too much, but if it’s miles off you have a problem.
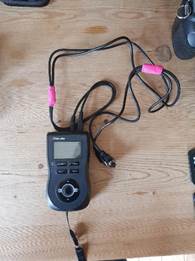
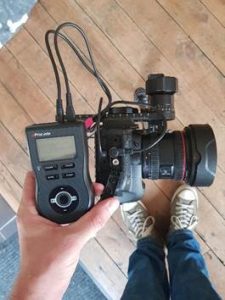
Promote:
This remote control plugs into the camera via the USB port on the side under the rubber flab and it also includes a shutter release cable. The end labelled ‘C’ goes into the camera, the end labelled ‘P’ goes into the promote.
There are many options but set it to ‘High Dynamic Range’
Now set the mid exposure, step value and the total number of exposures.
What we are aiming for is as much range from dark to light as possible. Ideally black or almost black at the bottom of the range to white or almost white at the top. You will have to vary step and mid exposure based on your lighting setup. Outdoor will require shorter exposures, indoor will require longer. The mid-exposure point is measured in seconds.
The step is the amount of exposure increase in between each photo.
The total exposures is how many photos you are taking per sequence. I leave it on 9 as standard but 11 or 13 would be fine too. It should always be an odd number as you define your mid point and then do 4 up and 4 down from that point giving a total of 9 exposures, for example.

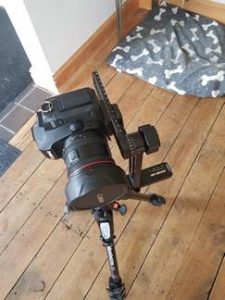
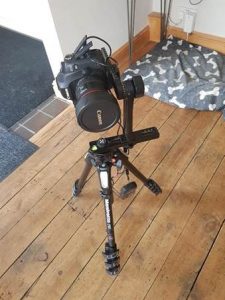
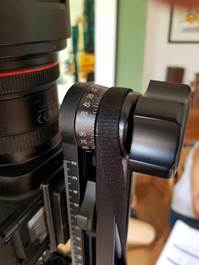
The assembled kit should look like this:
Taking a set of bracketed images
Set the white balance of the camera to the white balance of the film camera you are shooting on
Check you are shooting RAW and JPG versions of the files
Set lens to 8mm
Set your focus (ideally everything is in focus)
Set your mid point/step/total exposures on the promote
You will now need to take a series of 6 sets of bracketed images based off the sides of a cube. I take photos spinning around 360 degrees horizontally, then a set up and a set down. The base plate bracket is notched and marked for precision.
I take a bracketed series of images at 0, 90, 180, 270 on the horizontal base plate and straight up and down on the vertical.
Check your images for range and focus and note down the image number at the start and end of the 6 bracket sequence. That way you can grab them and organise them easily later without having to look at thumbnails as this number is part of the actual file name.
Here is an example of a good rangle to aim for:
Sorry – I can’t publish these images here due to usage restrictions
This is just one direction, you will need 6 of these sequences for complete coverage of the environment.
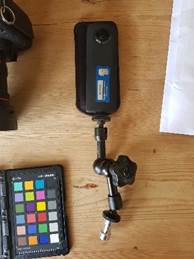
Theta S Method
This is much quicker but is hampered by an inability to set a custom white balance and the much more limited range of exposure settings. It will likely struggle to give adequate range in daylight or bright lighting. The images tend to be very noisy on dark lighting setups too. It doesn’t shoot raw either, though this tends to not be too much of an issue as I generally use jpgs for the processing anyway. RAWS only become useful if you wish to manually under or over expose your image sequence.
It is quick though and as an apparatus is much smaller than the 5D and Nodal Ninja so is easier to get into tight spaces. As such it is very useful for miniature sets where the size of other camera equipment becomes an issue.
It can be stood on the floor if necessary but I usually try to mount it on a small tripod – it reduces the overpowering influence of the floor in the resulting HDR. You have a repositionable mount in the kit for it.
You will need to download a bracketing app to use it. On Android I use the Theta S Bracket app.
You will need to pair the Theta with your phone:
When the camera is connected to a smartphone via a Wi-Fi network, you can use your smartphone to shoot remote photos and view still images/videos.
1. Press the power button on the camera to turn the power on
2. Press the wireless button to turn the wireless function on
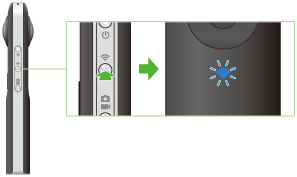
o The wireless lamp flashes blue.
3. Display the Wi-Fi settings of your smartphone
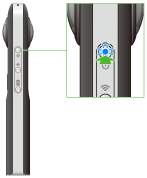
4. Select the SSID of the camera from the network list and enter the password
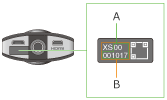
o The serial number printed on the base of the camera is the same as the SSID and password.
The SSID is “THETA” plus the serial number in the (B) section plus .OSC (in this case “THETAXS00001017.OSC”). The password is the numbers in the (A) section (in this case “00001017”).
o You can change the password from your smartphone.
o The password is initialized by pressing and holding the wireless button while the power is on. The power turns off automatically at this time.
o When the wireless connection is complete, the wireless lamp lights blue.
Fire up the app on your smartphone. In my case I am presented with:
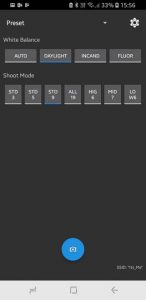
As you can see, there are very few options.
There are few configs available:
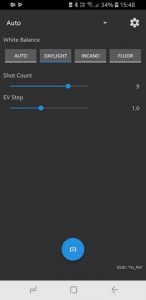
AUTO:
You can specify a rough white balance, shot count and the exposure step.
PRESET:
You can specify a rough white balance and choose from a pre defined range of exposures and mid ranges. They vary from bright light to low light presets.
In both cases you will have to experiment to get a good wide range and the images stay on the Theta. Thumbnails get passed back to the phone for reference.
An example of range is here:
Sorry – I can’t publish these images here due to usage restrictions
As you can see, it struggles to get the lower/darker end of the range.
Processing and Painting
The two approaches require different settings to create a final HDR. The 5D Method with the ninja requires stitching and layering, whereas the Theta comes out already stitched together and only requires layering.
In both cases I use PTGui to create the final out EXR, reference jpg and interactive QT.
5D
PTGui is intelligent enough to understand they are bracketed images in a sequence and will more than likely stitch and combine all the images automatically. If it doesn’t you may have to manually identify some key points across all the images.
The PTGui tutorials will give you instructions on this.
Theta S
The theta is a bit different and you will have to identify the type of lens used as follows:
Sorry – I can’t publish these images here due to usage restrictions
In both cases output a HDR image as an EXR and LDR images as both jpg and interactive MOV.
Sorry – I can’t publish these images here due to usage restrictions
Painting
The best program I’ve found for painting out rigging/tripods, etc. is Affinity Photo.
Import the EXR and project it onto a sphere (Layer -> Live Projection -> Equirectangular Projection) and paint using the clone tool in a similar way to Photoshop.
When you’re done, remove the projection and export the file as an EXR.